The GetDPI Photography Forum
Great to see you here. Join our insightful photographic forum today and start tapping into a huge wealth of photographic knowledge. Completing our simple registration process will allow you to gain access to exclusive content, add your own topics and posts, share your work and connect with other members through your own private inbox! And don’t forget to say hi!
Anyone using a center filter on the 43XL
- Thread starter Terry
- Start date
stephengilbert
Active member
Schneider doesn't list one (yet): https://www.schneideroptics.com/ecommerce/CatalogSubCategoryDisplay.aspx?CID=182 (Click the PDF link at end of last paragraph.)
Christopher
Active member
I find it amazing how long it takes them to work on them... I heard the same phrase a week after the 43mm got realeased...
dougpeterson
Workshop Member
Now estimated by Schneider for delivery in February.
Given previous promises/delay it seems wise to take that with a bit of salt.
Given previous promises/delay it seems wise to take that with a bit of salt.
GrahamWelland
Subscriber & Workshop Member
I find that with this kind of gear that it doesn't hurt to ask which year the month pertains to.  (but semi-serious alas)
(but semi-serious alas)danlindberg
Well-known member
Someone actually told me that there is no other type of filter that is even remotely as complicated and difficult to calculate and produce as centre filters, hence timeline and pricepoint.What is it with these LF companies?
I'm sure there is more to it but is a CF not just a clear glass filter with a simple grad pattern to match the lens...... Not hard IMO and doesn't take 2 years to design.
How truthful this statement is, I do not know, but atleast it could explain the somewhat slow progress to a finished product.
Probably very true but still very frustrating.Someone actually told me that there is no other type of filter that is even remotely as complicated and difficult to calculate and produce as centre filters, hence timeline and pricepoint.
dchew
Well-known member
Terry,
Not sure if this question came up later in another thread, but I finally got the center filter yesterday!
I have not had time to find a critical view for a robust test, but I did run out last evening and grab a few LCC's. This is on an IQ180 / Alpa STC, shifted 18mm right. I would show you the associated images but they are deceiving because the sky was getting dark and uneven.
I think it looks very promising. Sorry for the dust spots...
Ciao,
Dave
Hi Dave
I have the CF for the 43XL on order and if what I think I'm seeing from your results I'll be very happy.
Are the the LCC's with the magenta stripe exactly the same as the clear LCC but shot without the CF? If thats correct it makes a massive difference to the amount of usable shift the 43XL has. :thumbs:
Have you got any pictures of what it looks like mounted to the lens?
dchew
Well-known member
Gareth,
No, sorry that is not what I'm showing. Those are the raw unadjusted LCC vs. adjusted. All had the cf mounted.
I might have some time at lunch to do a few images for comparison with and without. I will also see what I can do about a photo of the lens with cf mounted. More to come...
Dave
No, sorry that is not what I'm showing. Those are the raw unadjusted LCC vs. adjusted. All had the cf mounted.
I might have some time at lunch to do a few images for comparison with and without. I will also see what I can do about a photo of the lens with cf mounted. More to come...
Dave
I agree , it would be really much more helpful to compare LCCs unadjusted with and without using the CF to make a judgement.
On paper the 43XL specs look really great but Schneider overstated the usable image circle so IMHO the CF might be the last lease of life for this lens if movements are crucial.
On paper the 43XL specs look really great but Schneider overstated the usable image circle so IMHO the CF might be the last lease of life for this lens if movements are crucial.
LCC's with and without the CF to show the difference would be really interesting and not forgetting the camera porn.
dchew
Well-known member
Warning: Long post!
This has been an enlightening few days. Every time I do a test like this I gain more respect for people who do robust tests. It’s very hard to do, and I don’t think this one is all that robust. There are so many factors that come into play even when doing something as simple as trying to compare a shot with vs without a center filter (CF). Same back, same camera, same lens, same f-stop; still a myriad of problems…
The biggest problem is the center filter changes the exposure (obviously). The only way to account for that in this test is to use the shutter speed since the test is very dependent on f-stop. Shutter speed is in 1-stop increments, which is too coarse. In order to get images to compare I had to reduce exposure on the shots with a CF by an average of -0.27 (1/4 stop).
The next problem is the LCC over-compensates for light falloff in my opinion. I don’t understand this since the LCC image is dead flat across the frame once correction is applied to itself. Yet when applying the LCC to an image it definitely gets brighter out at the edges. Compounding the problem is the fact that blue sky is not even across a wide 43mm frame, especially when shifted. This time of year the sun is still too low in the sky where I live to get an even distribution across the frame. All this is important because as the lens fails out at the edge it gets de-saturated and contrast goes flat with the LCC applied. It is not easy to judge between these failures when the image appears to be getting brighter at the same time. This overcompensation brings up the question: Should I do this test with “Light Falloff” at 100% to produce a technical comparison or should I mess with that slider, which of course adds my subjective eyes into the equation…? In the end I did one example both ways.
This could have to do with how I shoot an LCC. I simply slow the shutter speed 2-3 stops, hold the card with my thumb and middle finger in front of the lens with my hand below or to the side and shoot. I target a brightness of 200-230 after the LCC is applied. Is that too bright? Is my hand affecting the LCC? I should know this stuff!!
I did these tests with horizontal shift because with the IQ180 shifting the long direction has significantly more color problems. I will show the result of a vertical stitch shifted 18mm L/R.
Conclusions:
In these images, adding the CF makes a difference, but not as much as I hoped. A better test would be one where the image has some dark areas in the corners in order to compare noise in the 6-12mm shift range. I suspect that would show a bigger difference.
After about 10-11mm shift, the image gets pretty soft for my taste. So for me success is defined as getting a “well-corrected” image out to 11mm shift. In that regard, I am glad I got the CF. Not to mention the LCC will not work as hard on all un-shifted images.
All of this is image dependent. There are many images I have that look pretty darn good out farther than 11mm because the subject matter is forgiving. Even in architecture, a gray building could be shifted more than one with strong colors because of the saturation problems.
The problem here is clearly the IQ180’s ability to handle light at steep angles. A 18mm horizontal shift both ways is a 98mm image circle. The 43xl is supposed to have a 110mm IC, and I bet it does. This is not much of a light falloff problem; it is a colorcast problem. That’s why the CF does not make a huge difference.
The good news is it improved the image to the degree I needed. Horizontal shifts go to about 11mm, which I am happy with. Vertical shifts (movement in the short-side direction) seem to work very well. With a simple grad adjustment in LR (saved as a preset), I get workable stitches. So for me it is staying on the lens and was worth the $$.
Technical stuff:
SK 43xl Alpa mount
Schneider center filter IIie
Alpa STC
IQ180
Phase One LCC card
Processed in Capture One 6.3.5 using “Analyze (technical wideangle)”
Color readout applied to image center then Exposure adjusted to match
Exported to Lightroom 4 as 16bit tiffs with sharpening disabled
Apply sharpening in LR
Experimented with grad adjustment in LR
Please don’t judge these images on sharpness or artistic qualities. Frankly they suck for that.
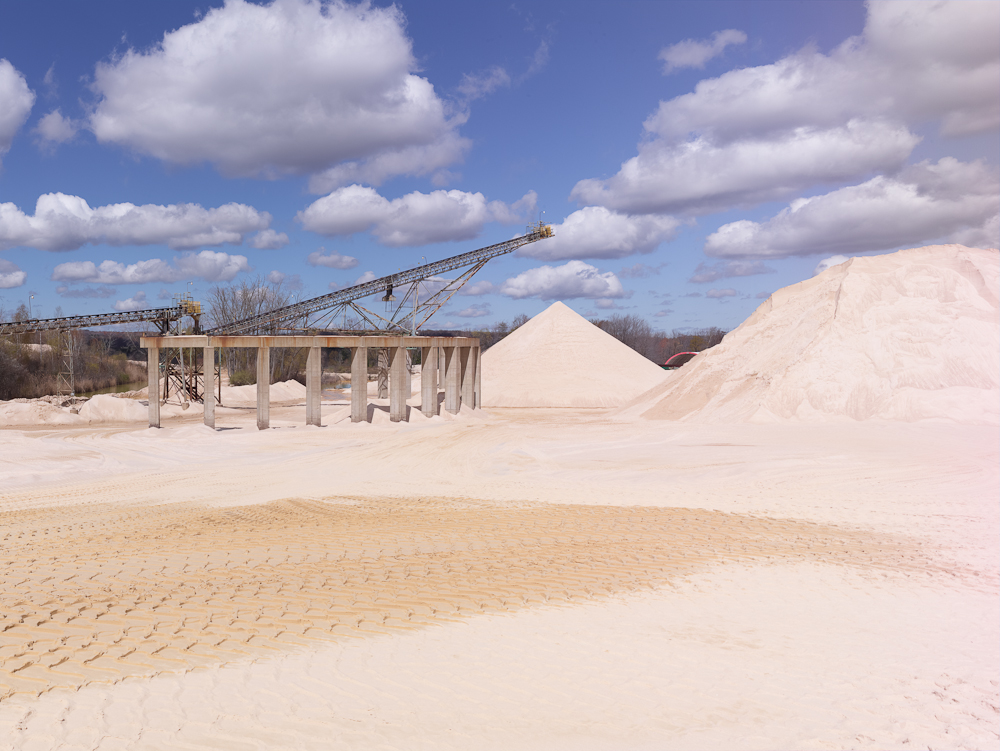
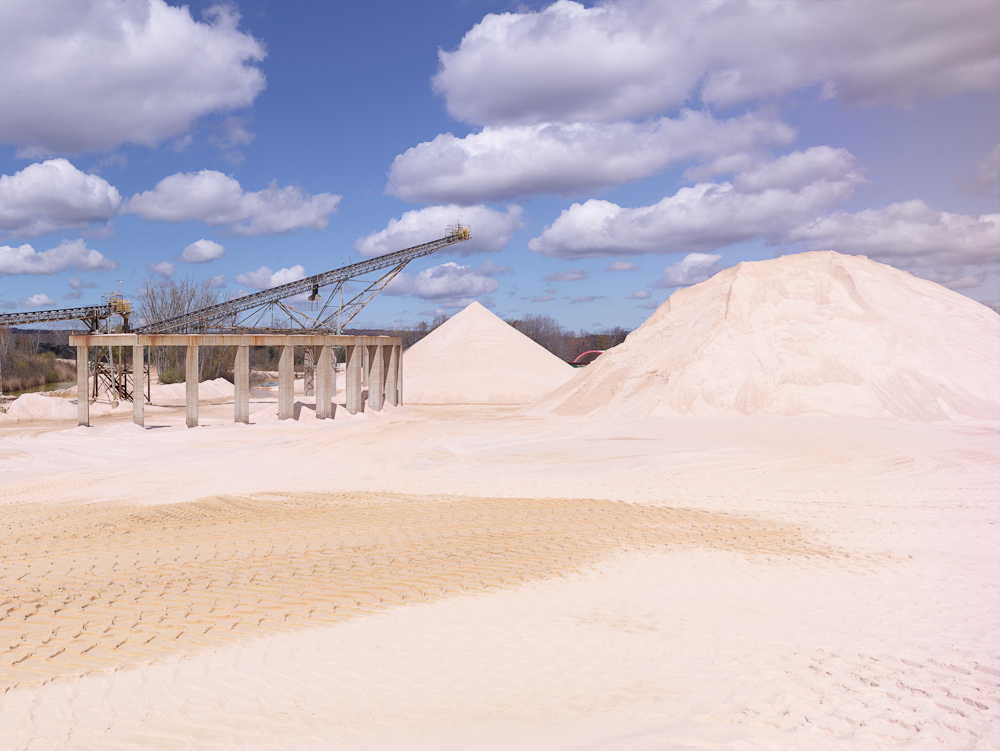
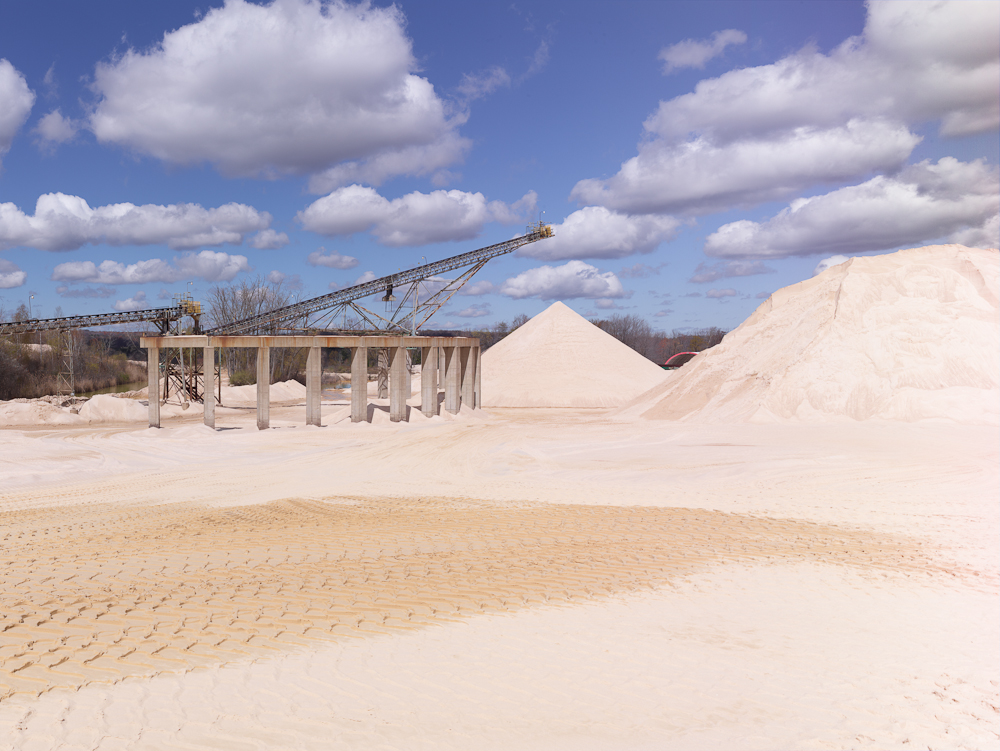
Sand Pile
This was my first attempt. Unfortunately I moved the camera when taking off the CF, but the clouds moved anyway. You can clearly see what happens on the right side. Now before you scream too loud, that is the equivalent of a 98mm image circle. I think the CF extends the usable image area about 1/3 further than without the CF.
With CF
No CF
Here is a quick attempt to add a grad in LR to the CF image. There is a contrast & saturation boost, along with tint adjustment to reduce magenta cast.
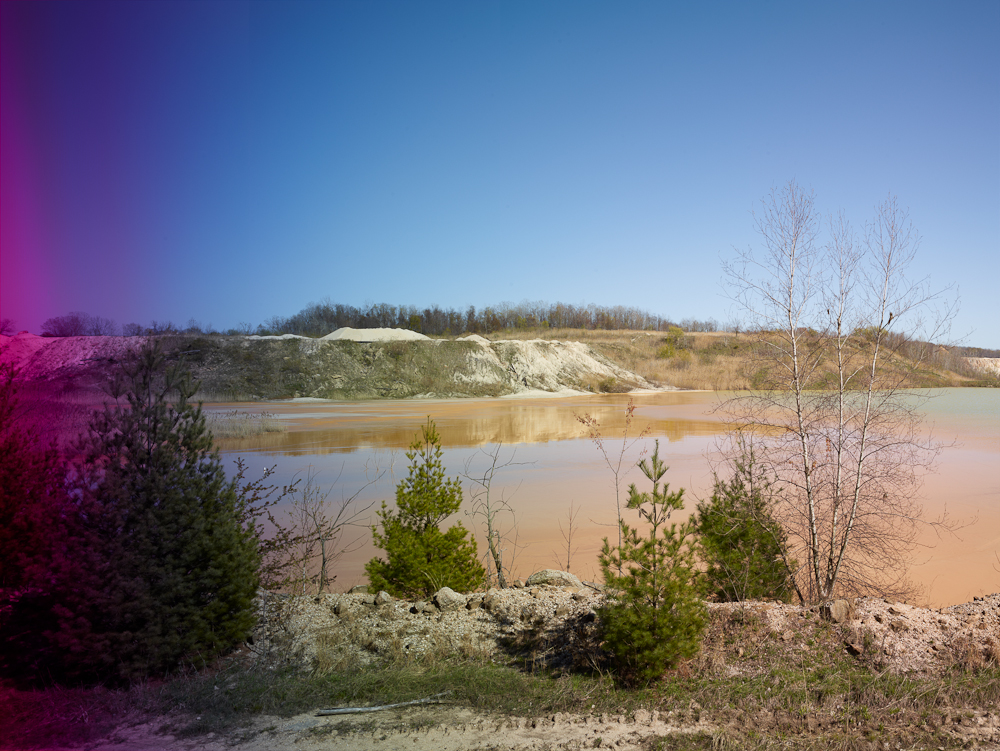
Settling Pond
Another direct comparison with and without a CF. First with no LCC applied:
With CF
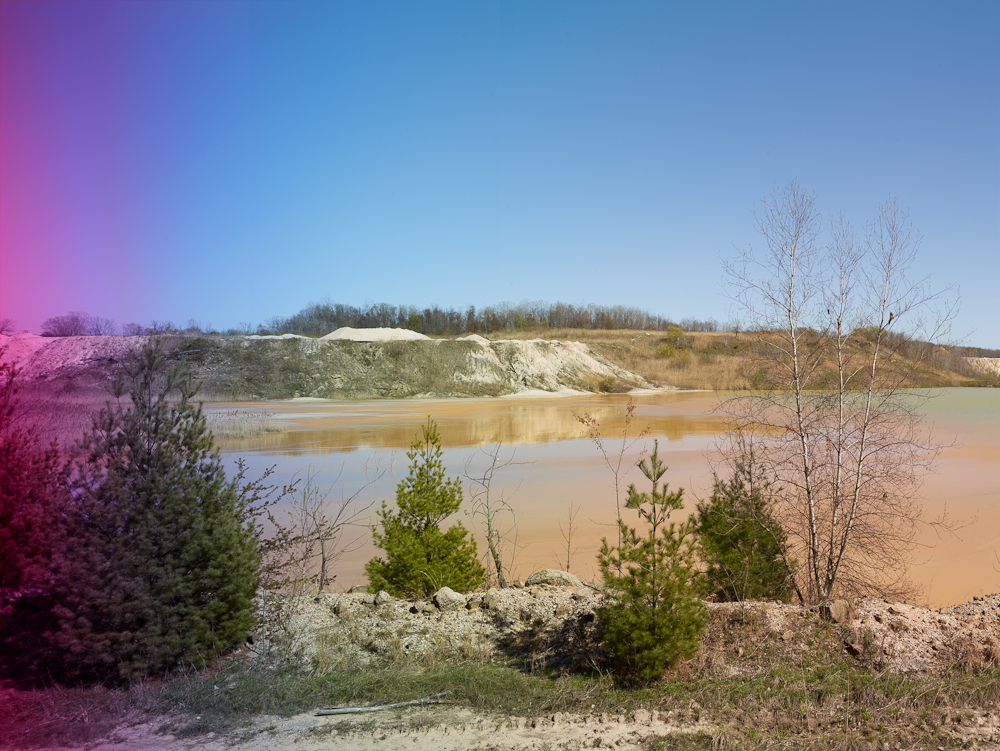
No CF
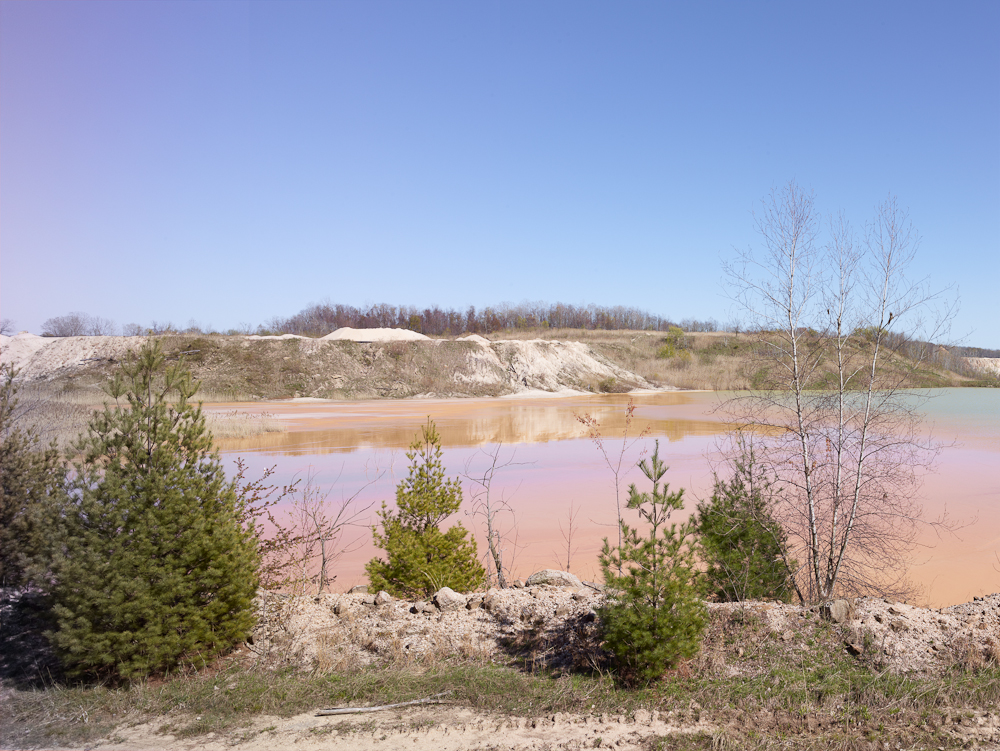
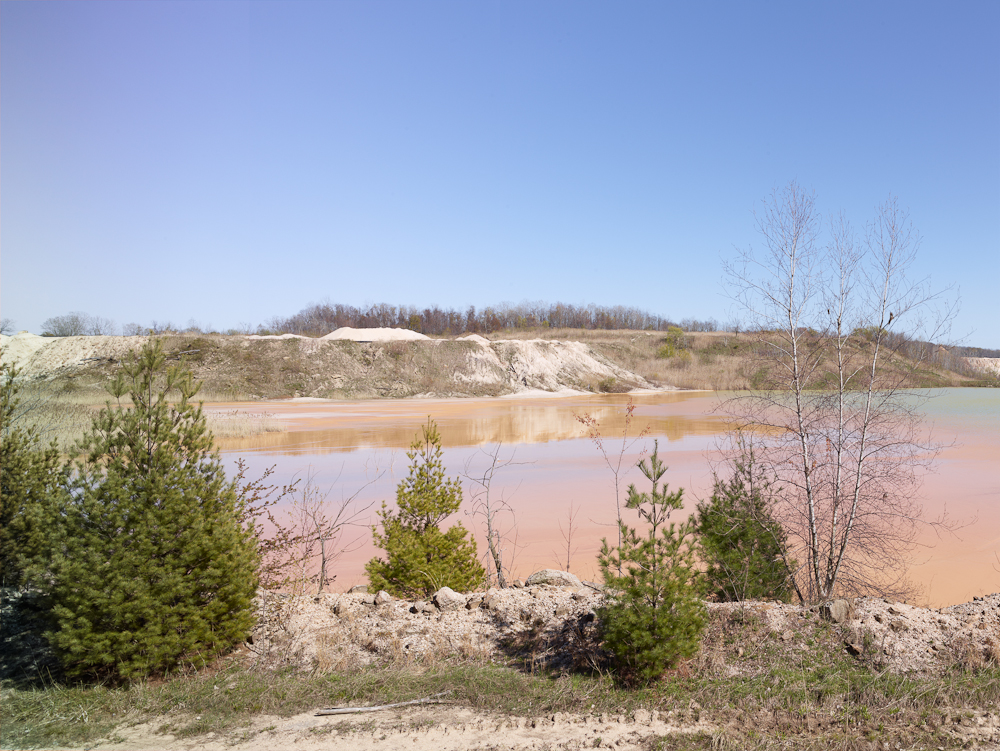
Here with LCC’s. Subtle, but the CF image has less cast. I adjusted the falloff on these images: with CF 67% falloff, without CF 81% falloff.
With CF

No CF
Here is the CF image with a LR grad added on the left side to compensate for contrast, saturation and magenta cast. Still needs a bit of work...
Ladue Reservoir
This is a three-image vertical stitch shifted 18mm. Turns the 43 into a 32mm. Nothing was done other than applying the LCC’s and stitching in Photoshop CS6b. This image is 150MP
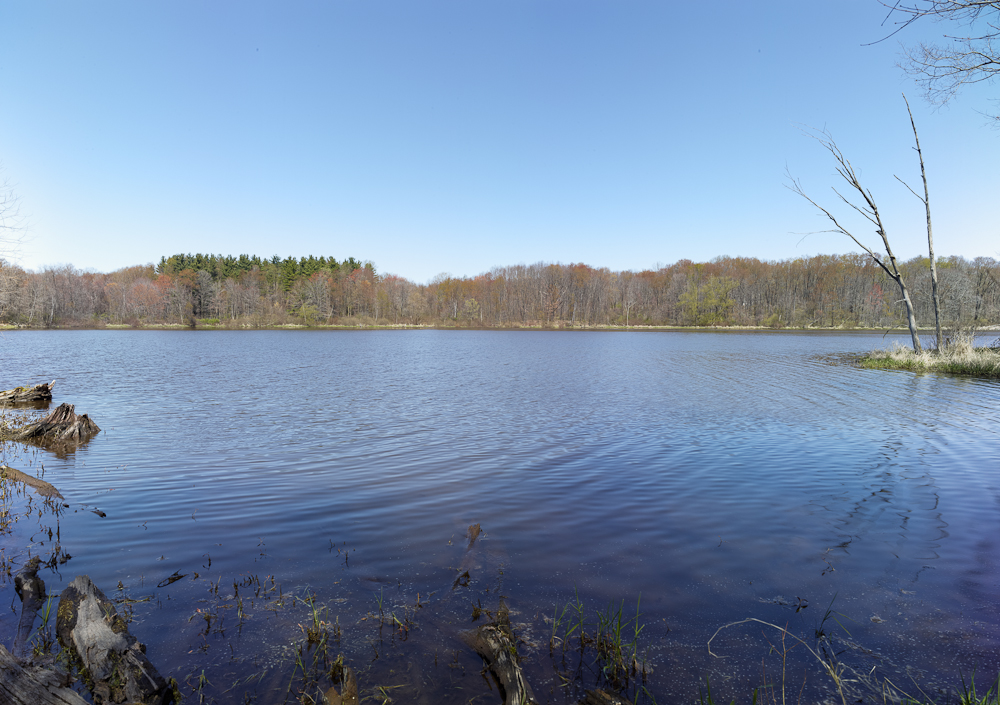
With a little bit of work I think this is a usable combination. Before I only went to about 12mm.
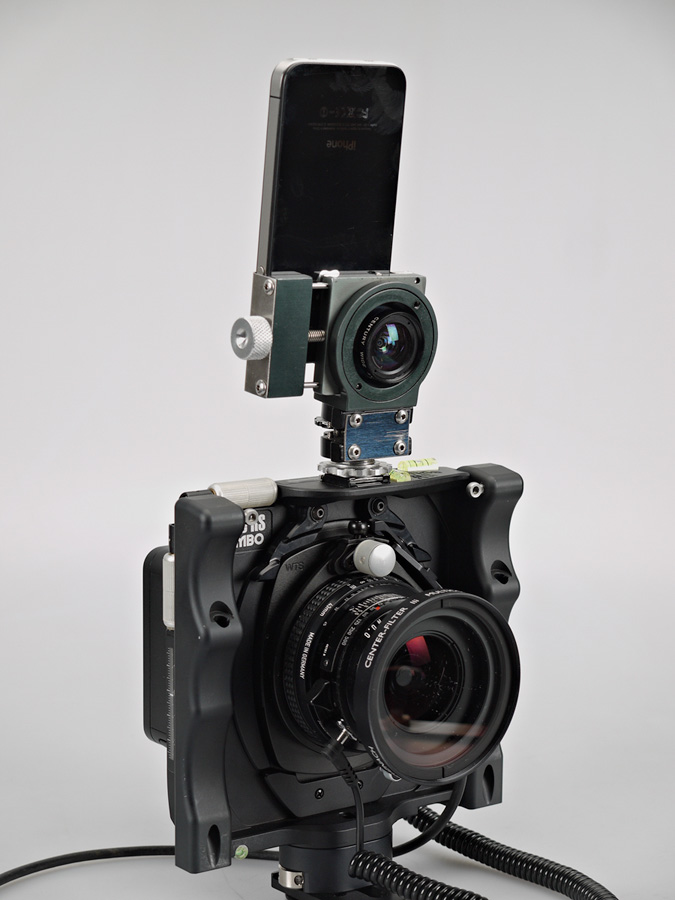
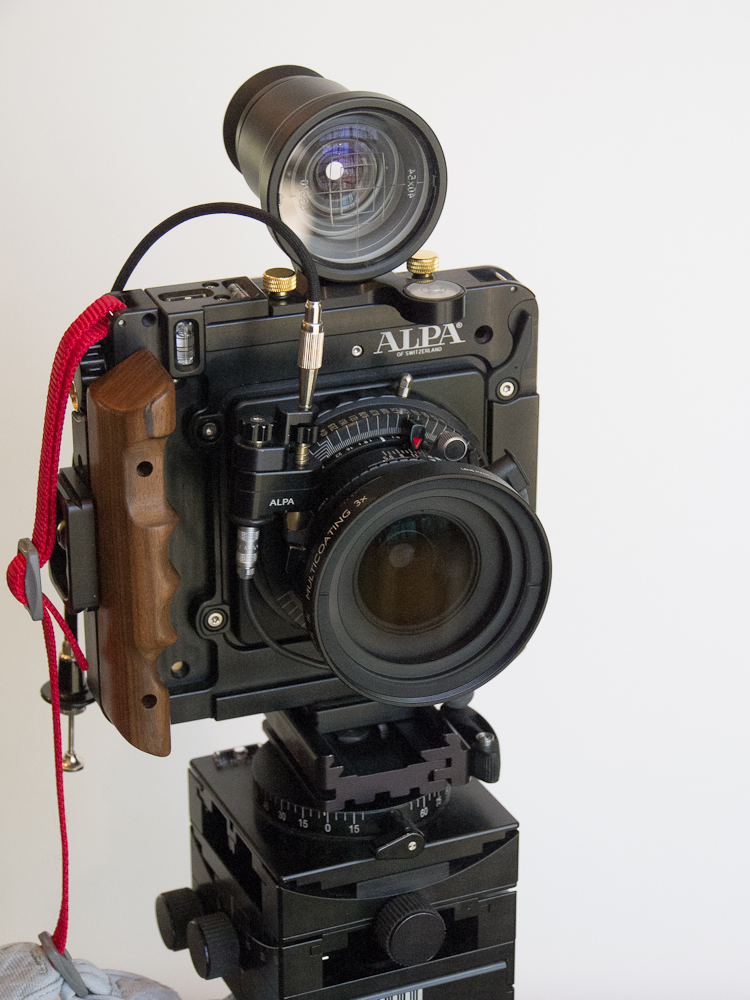
Camera Porn
Here you go…

Ciao,
Dave
This has been an enlightening few days. Every time I do a test like this I gain more respect for people who do robust tests. It’s very hard to do, and I don’t think this one is all that robust. There are so many factors that come into play even when doing something as simple as trying to compare a shot with vs without a center filter (CF). Same back, same camera, same lens, same f-stop; still a myriad of problems…
The biggest problem is the center filter changes the exposure (obviously). The only way to account for that in this test is to use the shutter speed since the test is very dependent on f-stop. Shutter speed is in 1-stop increments, which is too coarse. In order to get images to compare I had to reduce exposure on the shots with a CF by an average of -0.27 (1/4 stop).
The next problem is the LCC over-compensates for light falloff in my opinion. I don’t understand this since the LCC image is dead flat across the frame once correction is applied to itself. Yet when applying the LCC to an image it definitely gets brighter out at the edges. Compounding the problem is the fact that blue sky is not even across a wide 43mm frame, especially when shifted. This time of year the sun is still too low in the sky where I live to get an even distribution across the frame. All this is important because as the lens fails out at the edge it gets de-saturated and contrast goes flat with the LCC applied. It is not easy to judge between these failures when the image appears to be getting brighter at the same time. This overcompensation brings up the question: Should I do this test with “Light Falloff” at 100% to produce a technical comparison or should I mess with that slider, which of course adds my subjective eyes into the equation…? In the end I did one example both ways.
This could have to do with how I shoot an LCC. I simply slow the shutter speed 2-3 stops, hold the card with my thumb and middle finger in front of the lens with my hand below or to the side and shoot. I target a brightness of 200-230 after the LCC is applied. Is that too bright? Is my hand affecting the LCC? I should know this stuff!!
I did these tests with horizontal shift because with the IQ180 shifting the long direction has significantly more color problems. I will show the result of a vertical stitch shifted 18mm L/R.
Conclusions:
In these images, adding the CF makes a difference, but not as much as I hoped. A better test would be one where the image has some dark areas in the corners in order to compare noise in the 6-12mm shift range. I suspect that would show a bigger difference.
After about 10-11mm shift, the image gets pretty soft for my taste. So for me success is defined as getting a “well-corrected” image out to 11mm shift. In that regard, I am glad I got the CF. Not to mention the LCC will not work as hard on all un-shifted images.
All of this is image dependent. There are many images I have that look pretty darn good out farther than 11mm because the subject matter is forgiving. Even in architecture, a gray building could be shifted more than one with strong colors because of the saturation problems.
The problem here is clearly the IQ180’s ability to handle light at steep angles. A 18mm horizontal shift both ways is a 98mm image circle. The 43xl is supposed to have a 110mm IC, and I bet it does. This is not much of a light falloff problem; it is a colorcast problem. That’s why the CF does not make a huge difference.
The good news is it improved the image to the degree I needed. Horizontal shifts go to about 11mm, which I am happy with. Vertical shifts (movement in the short-side direction) seem to work very well. With a simple grad adjustment in LR (saved as a preset), I get workable stitches. So for me it is staying on the lens and was worth the $$.
Technical stuff:
SK 43xl Alpa mount
Schneider center filter IIie
Alpa STC
IQ180
Phase One LCC card
Processed in Capture One 6.3.5 using “Analyze (technical wideangle)”
Color readout applied to image center then Exposure adjusted to match
Exported to Lightroom 4 as 16bit tiffs with sharpening disabled
Apply sharpening in LR
Experimented with grad adjustment in LR
Please don’t judge these images on sharpness or artistic qualities. Frankly they suck for that.
Sand Pile
This was my first attempt. Unfortunately I moved the camera when taking off the CF, but the clouds moved anyway. You can clearly see what happens on the right side. Now before you scream too loud, that is the equivalent of a 98mm image circle. I think the CF extends the usable image area about 1/3 further than without the CF.
With CF
No CF
Here is a quick attempt to add a grad in LR to the CF image. There is a contrast & saturation boost, along with tint adjustment to reduce magenta cast.
Settling Pond
Another direct comparison with and without a CF. First with no LCC applied:
With CF
No CF
Here with LCC’s. Subtle, but the CF image has less cast. I adjusted the falloff on these images: with CF 67% falloff, without CF 81% falloff.
With CF
No CF
Here is the CF image with a LR grad added on the left side to compensate for contrast, saturation and magenta cast. Still needs a bit of work...
Ladue Reservoir
This is a three-image vertical stitch shifted 18mm. Turns the 43 into a 32mm. Nothing was done other than applying the LCC’s and stitching in Photoshop CS6b. This image is 150MP
With a little bit of work I think this is a usable combination. Before I only went to about 12mm.
Camera Porn
Here you go…
Ciao,
Dave
Last edited: